Pinterest Hover Button

Showing posts with label Knitting Tidbits. Show all posts

Wednesday, October 7, 2009

Traveling Scarf


Oh, my, it's been a long time since I've posted! I've still been knitting, but am just getting back into "serious" knitting now that fall weather is here.


For the last several weeks, I have participated in a Ravelry traveling scarf project. Eight knitters each started a scarf and the scarves then traveled to all team members, who each knitted a little section. Each person got their scarf back this week and the results were amazing.


I chose a simple ribbed pattern of K2, P2 with the first stitch slipped to help it lay flat at the edge. I asked that each person use two strands of sock yarn. What a soft and squishy and colorful scarf! It's my new favorite and I'll think of those who contributed to my lovely scarf when I wear it.


Wednesday, July 15, 2009

Summer Dish Cloth Knitting


Warm summer weather and knitting dish cloths go together like, well, summer and dish cloth knitting! Knitting dish cloths is quick, easy, and rewarding. And dish cloths make great gifts - everybody who receives one wants a couple more, so be prepared to invest in a lot of cotton.

The stack pictured above is a week's worth of evening knitting using Sugar & Cream yarn that I picked up on sale for $1 a ball. My newest favorite yarn for dish cloths, however, is something I tried from Hobby Lobby called I Love This Cotton. It is super-soft, easy to knit, and comes in cool colors. The feel is really nice - very soft and not at all rough like the Sugar & Cream. I wouldn't mind a garment out of that soft cotton yarn. I picked up a few more skeins on sale yesterday for $2 a skein and am ready to tackle another round of summer dish cloth knitting!

Saturday, June 27, 2009

Ravelry Swap - "My Other Hobby"

This year I've joined a couple of swaps on the online Ravelry knitting group. The one I am currently in is called "My Other Hobby" swap. The idea behind this swap is that you are assigned a secret swap partner. You send a couple of teaser notes or small packages, then the "big reveal" package where you include something from a hobby of theirs, a handmade item from one of your hobbies, some yarn and maybe a little goodie or two.

For the past two months, someone has been stalking me for this Ravelry swap :-) I've received anonymous comments on my blog saying things like "A package is winging it's way to you" and "I'm your secret Ravelry partner." My first teaser package was great - a cute tea towel from Wales with Welsh recipes on it, an adorable little tin with sewing pins inside, and some cool buttons.

My second teaser package included an embossed leather bookmark from Cambridge, a great recipe book called 101 Teatime Treats that had scrumptious looking recipes for baked goodies, and an emergency Swiss dark chocolate bar. The mystery continues!


Today I received my "big reveal" package, all the way from England! cloverpavlova, aka Jayne, sent me the most wonderful box of goodness!


Jayne included some beautiful sunflower notecards, a magnetic menu/shopping note set (perfect on my fridge), a musical notepad, and a great little notebook with a London subway map cover.


The edible goodies are fantastic! Two special curry packages (I love curry!), some orange and lemon hard candies, some organic "inspiration" tea, and Lindt and Dominican Republic dark chocolate - yum!


The "book" in the picture above is actually a card - how clever! More cool stuff... a cd of favorite songs from movies and a special breast cancer pin from England.


Beautiful, hand dyed, 100% superwash merino sock yarn from Colinette - oh my! I love the bright fuschia colorway and can't wait to knit up something pretty with this gorgeous yarn. I also received some quilting squares from one of my favorite fabric designers (Moda) in fun retro patterns. They will make a lovely quilt.

Now isn't that just the cutest handmade brooch pin you've ever seen? Jayne made that for me and I love it! I'm a big pin person, and use them on shawls, hats, purses, jackets, and tops. Love, love, love everything I received from my wonderful swap partner! Thanks so much, Jayne :-)

Saturday, May 30, 2009

Not Knitting, But I've Been Busy!

I've had a friend visiting for the past couple of weeks and she's a sewer, not a knitter. So we hit the sewing room and got creative with some projects. I made about 20 of these.


These bags are made from old t-shirts and are a great way to recycle your favorite t-shirt.

Then we made several of these.


I like to tuck a Starbuck's gift card in and give them for a little gift.

I also made myself a purse from a couple of fat quarters. I think I'll be doing another one of those - they're fun to do and I like the size of the purse.


Now it's time to get back to knitting!

Wednesday, May 20, 2009

Summer Knitting?

For me, knitting has always been a cold weather activity. Knitting season has been fall through early spring and late spring and summer have been my time for "other" projects. This year, I decided that I will try to continue to knit year-round. I've got such a queue of projects and I know it will be good to get going on some of them.

Yesterday's temps hit the 90's for the first time this year and already I know I'm not going to be knitting with wool on those hot days. I picked up some cotton and made a couple of dishcloths and another swiffer cover. I hope I can keep my goal to knit year-round, but I find my sewing machine calling me to make work on a quilt. . .

Sunday, May 10, 2009

Are There Really Yarn Shops in Boston?

I just got back from a week in Boston. Of course I came prepared to explore local yarn shops, and had googled yarn shops in the area before I left for my trip. Armed with my printout of yarn shops, I plugged into my gps the address at 555 Armory Street for a yarn shop called Circles in Jamaica Plain. When I arrived at the building, no yarn shop was there. I checked my iphone and found a discussion that indicted the shop had moved to the city of Roslindale. Ok, I was determined, so I set my gps for the new address at 56 Murray Hill Road in Roslindale. When I arrived, I discovered the shop was in a private home. I rang the bell, but no one answered. Dang.

While in Roslindale, I struck up a conversation with a cheese shop owner who told me about a wonderful yarn shop at 4 Station Street in Brookline called A Good Yarn. I got all excited about visiting a recommended yarn shop, until she said the shop was closed on Mondays. It was Monday, of course.

Later in the week I was visiting a friend in Peabody and decided to see if there were any shops nearby. Yup, a yarn shop really close called Knit Wit Yarns at 474 Lowell Street! I high-tailed it down there only to discover it no longer was there. The shop had either moved or gone out of business.

I can't believe I struck out so many times! I came home with no new yarn, but did manage to finish a pair of socks, a couple of dish cloths, and a swiffer cover during my week in Boston. Maybe next time.....

Monday, April 27, 2009

Mankato Knitting Group


There is a group called Mankato Yarn Together, which is one of the groups on Ravelry designed to let people in a specific area discuss knitting and get together for some knitting time. They meet the last Sunday of the month.

Yesterday I joined our local knitting group at Dunn Brother's Coffee for a couple hours of knitting and sharing of yarns (pun intended.) I guess anywhere from three or four to more than a dozen knitters show up each month for the monthly get-together. It was fun to meet everyone - it surprised me that I didn't know any of these knitters, since I'm always in local yarn stores and have taken several classes. Always great to see what others are working on, and there were some cool projects.

I'm still plugging away at a pair of socks I've had on my needles for a couple of months. I was three quarters of the way completed with the second sock and decided to add some length to the first one, so now I still have two unfinished socks. Knitting on planes has always been productive for me, so maybe I'll complete these when I fly to Boston later this week.

Sunday, April 19, 2009

Textile Center Garage Sale


The Textile Center Garage Sale in was held this past weekend in Minneapolis. I haven't really been very involved in anything at the Textile Center, since I'm 2 hours away, but this year I decided to become a member. My first event was the Garage Sale.

I volunteered to help with the Garage Sale Silent Auction items on Friday afternoon before the Friday "pre-sale" party and the Saturday sale. It went smoothly and was fun to see some of the different pieces that came through. One of the "perks" of volunteering is that you are allowed to purchase items at the end of your shift.

There were oodles of yarn and of course I picked up a bunch. Probably the most unusual yarn I got was 12 skeins of a Furlana yarn made with 80% merino and 20% possum fur. It's a yarn from New Zealand and looks interesting...... Also got some Euroflax linen, some aqua blue yarn perfect for a felted purse, and some odds and ends. All at great "garage sale" prices!


They also had knitting machines, looms, and sewing machines. I didn't see any spinning wheels, but I really don't need to start another hobby right now anyway. TONS of fabric, which I barely glanced at. Even though I'm a quilter, the rows and rows of tables were just so overwhelming that I concentrated just on yarn and didn't shop for fabric. I'll definitely be back next year!

Monday, April 13, 2009

Bismarck, ND Yarn Shops

Spending a little time in Bismarck, ND recently, I decided to check out the local yarn shops one afternoon. I googled yarn shops in Bismarck and was surprised to find several listed.

The first store I visited was Impact Gallery & Gifts on Broadway, right downtown. It was a fun store with lots of local artist wares. The sales clerk was really nice and explained about the local artist offerings and also explained that the store was phasing out of yarn, but had a few skeins left in a basket in the corner. I dug through the half dozen skeins and found a couple of skeins of yarn that would work well for a market bag. They were marked half price ($5 each!) and then when I brought my purchases to the cashier, they subtracted an additional 20% from a current sale. Great price - wish they had more yarn.

Next I walked a block up Broadway and found cedesigns Yarn Shoppe. Now here was some serious yarn!
Lots of great yarn, but I was also impressed with some of the knitted display items that the owner (a very nice woman) had made. Obvious talent here! I commented on this cute wrap (pictured below) and asked if she sold the pattern. She said she hadn't written it up yet, but wanted to get more of her patterns written down so she could put them on her website. Knitting without a pattern and creating something this cool? I'm impressed. I'll be watching her website for some of her original patterns.
Another yarn shop in the area was Sage Junction Yarns, listed with a Mandan address. All I can say is, good thing I had my gps! I drove for twenty some miles in the middle of a very snowy countryside. Mona (my gps voice) finally stated "Arriving at destination on right."
I saw a brown rambler style home and pulled in the driveway. There was a small sign on the mailbox saying Sage Junction Yarns. I guess I was in the right place - there was a tiny little sign on the front door saying yarn sold. I could see in the front window and saw someone's living room, but no yarn. I felt a little funny just knocking on someone's front door, but it didn't matter, as no one was home.

Wednesday, March 25, 2009

Hiatus

I will be unable to update my blog for a couple of weeks. I've been recruited to help with sheltering for the American Red Cross for people affected by the flooding in North Dakota. I'll be back in a few weeks. In the meantime, here are a few pics of the hundreds of folks helping to fill sandbags in Fargo.


Fabulous Felted Purse Patterns - Day 10 ~ The Bobble Bag

JaneyP offers this cute spring bag called the Bobble Bag. Her free pattern and pics were posted on the Craftster forum. I've always heard that white does not felt well, but this bag seems to have had no problems felting.


Felted ‘Bobble’ Bag

Materials:

3 x 50g Balls Aran Weight 100% pure wool yarn.
Scraps of DK yarn for bobbles
Wadding and small amount of stuffing
Lining Fabric
4.5 mm Knitting Needles US 7
Knitting Needles to match yarn for bobbles
Button and elastic
Piping Cord to fit top edge

Pattern

Cast on 65 sts
SS for 8 rows
Knit 23sts Cast off 19sts Knit 23sts
Purl 23sts Cast on 19sts Purl 23sts
SS for 50 rows
Cast off 7sts at beg of next 2 rows.
SS for 20 rows
Cast on 7 sts at beg of next 2 rows
SS for 50 rows
Knit 23sts Cast off 19sts Knit 23sts
Purl 23sts Cast on 19sts Purl 23sts
SS for 8 rows
Cast off

Stitch side seams together
Stitch base seam together to form boxy shape.

FELT!!

Cut a piece of wadding to fit inside of bag below handle opening.
(like the shape of bag before stitching up)

Put into the bag.& pin in place
If the bag is ‘floppy’ even after felting, rol over the top edge of the bag, encasing the piping cord as you stitch. This gives the bag a good strong handle and edge.

Make Bobbles

Using needles to match the type of yarn you have chosen for the bobbles
Cast on 5sts
Garter stitch 7 rows
Cast off
Stitch cast on and cast off edges together
Gather round one open end and fasten off
Stuff lightly
Gather round other end fasten tightly and pull yarn through bobble to create a nice round shape. Leave tail end to sew bobble to bag.

Finishing
Stitch bobbles onto bag wherever you want, stitching through the wadding to hold it in place.

Embroider your design

Lining
Cut a piece fabric similar to the piece of wadding allowing extra to fold over top edge.
Stitch side seams and base edge.
Place inside bag folding over top edge so that it sits nicely below handle
opening.
Stitch along top of lining with a slip stitch. (if you want you can stitch your elastic loop on at the same time so you can hide the ends of the elastic)
Put a couple of stitches through base corners to hold lining down.

Stitch on a button and a loop of elastic on opposite side to fasten the bag with.

Tuesday, March 24, 2009

Fabulous Felted Purse Patterns - Day 9 ~ Ayla Backpack

Here's an adorable backpack to knit and felt. It's offered as a free pattern at knitty.com and was designed by This is a perfect project if you've never done colorwork before. Any messy color changes will be felted away."


model
:
Ayla photos: Margot Centanni, Jordana Paige

Here's the link to the free pattern: Ayla Backpack


Monday, March 23, 2009

Fabulous Felted Purse Patterns - Day 8 ~ Mitered Squares Bag

This bag is beautiful! It was offered as a free pattern on the domestic sphere blog (she's moved on and no longer maintains the blog.) But what a cute purse ~ and the directions are detailed and easy to follow for a bag that looks more complicated that it is.

Felted Bag with Mitered Squares


MATERIALS
5 skeins Noro Kureyon [100% wool; 100m per 50g skein]; colorways 124 and 128
1 US size 10 [6mm]circular needle [or size to obtain gauge]
2 bamboo purse handles
stitch markers

GAUGE
13 sts and 26 rows = 4" in garter stitch.

SIZE
15 x 15 x 5 inches prior to felting
9 x 11 x 3.5 inches after felting

DIRECTIONS
The purse is worked in one piece beginning with the bottom. The diagram below shows the order in which the mitered squares that make up the bag are knit. Mitered squares are worked all in garter stitch. Even rows are worked plain, On each odd row, a double decrease is worked at the center -- this creates the square.

BOTTOM OF BAG
Cast on 32 sts using a knitted or cable cast on.

SMALL SQUARE
Row 1: K14, K2tog, place marker, K2tog, K14.
Row 2 and all following even rows: Knit.
Row 3 and all following odd rows: Knit to 2 sts before marker, K2tog, slip marker, K2tog, knit to end of row.

When 2 sts remain, remove marker and K2tog. Do not bind off last stitch.

To work second small square:
From the live stitch, pick up 15 more stitches along one side of the square [one stitch per garter ridge]. 16 sts on needle. Cast on 16 additional stitches using cable cast on -- 32 sts.

Work these 32 sts to create a second small square.

Repeat this process once again to create a third square in line with the first two.

FRONT AND BACK OF BAG
Beginning with the remaining live stitch, pick up 23 additional stitches along one long side of the bag's bottom, one stitch per garter row. The last stitch you picked up should be at the center of the piece. Cast on an additional 24 stitches [48 sts on needle].

Work the large square as you did the small one:

LARGE SQUARE
Row 1: K22, K2tog, place marker, K2tog, K22.
Row 2 and all even rows: Knit
Row 3 and all remaining odd rows: K to 2 sts before marker, K2tog, slip marker, K2tog, K to end of row.

Work a second large square above the first. This time, break yarn and pull through last st to secure.

Go back to the bottom of the bag and pick up 24 sts along the bottom of bag and 24 sts along the first large square. Work these 48 sts as described for the large square.

When this square is finished, work another above it to complete the first side of the bag. Break yarn and secure it by pulling through the last stitch.

Work the back as you did the front with 4 large squares. Referring again to the diagram for the order of squares.

SIDES OF BAG
The sides of the bag are worked in double-mitered squares which look like U shapes. The technique is very similar to the technique used above.

Beginning at the point where the bottom and front of the bag meet, count back 16 garter ridges from the bottom of the bag. Pick up 16 sts from the front of the bag, 16 sts along the bottom of the bag and 16 sts from the back of the bag.

Row 1: K14, k2tog, place marker,k2tog, k12, k2tog place marker, k2tog, k14.
Row 2 and all even rows: Knit.
Row 3 and all remaining odd rows: K to 2 sts before first marker, k2tog, slip marker, k2tog, knit to 2 sts before second marker k2tog, slip marker, k2tog, k to end of row.

When there are no longer any stitches left between the two markers, K 1 even row, then use a three needle bind off to seam remaining sts together. Break yarn and secure.

Work a second and third U above the first. The third U should come to the top of the bag.

Work the second side panel the same on the remaining side.

FINISHING
Decide which is the wrong side of the bag and work in all ends on the wrong side.

If desired, pick up 128 sts along the top of the bag (one for each stitch or garter ridge) and knit a couple of rows, then bind off loosely.

FELTING
Place finished bag in a zipped laundry bag and toss into the washer with a pair of old jeans. Put washer on "hot", "small load" and "heavy duty" settings. I ran mine through the wash cycle twice and allowed the bag to be spun out.

Block bag on appropriately sized box. and allow to dry thoroughly. This may take a couple of days.

Sew handles in place with appropriately colored heavy duty thread or yarn. Noro Kureyon is not particularly strong, so it may not be the best choice for sewing on the handles.

Sunday, March 22, 2009

Fabulous Felted Purse Patterns - Day 7 ~ The Balloon Bag


I love the shape of this bag, which is blocked with an inflated balloon! The i-cord at the cop edge really finishes this bag.

This pattern is another from Diane Sutliff and is offered as a free internet pattern. This bag can be knit with 3 balls of complimentary Kureyon, double stranded. You can download the pdf file here: Balloon Bag

Saturday, March 21, 2009

Fabulous Felted Purse Patterns - Day 6 ~ Brown Bag

Now here's a creative idea for a lunch bag! This little bag was designed by a high school student and is offered as a free pattern at knitty.com.

SIZE
One (comfortably fits a sandwich, cupcake, juice box, and small bottle of aspirin)

FINISHED MEASUREMENTS

Before Felting
Width: 9 inches
Depth: 7 inches
Height: 13 inches
Flap: 6.5 (w) x 7 (h) inches

After Felting
Width: 7 inches
Depth: 4.5 inches
Height: 7.5 inches
Flap: 6 (w) x 4.25 (h) inches


MATERIALS
Cascade 128 [100% Peruvian Highland Wool; 128yd/117m per 50g skein]; color: 1208; 2 skeins

1 16-inch US #10.5/6.5mm circular needle
2 stitch markers
Tapestry Needle
Purse fastener or Button of your choice


GAUGE
Approx. 12 sts = 4 inches in stockinette stitch.
Exact gauge is not important for this project.

PATTERN NOTES

The base of this bag is worked back and forth in garter stitch, then stitches are picked up around the circumference of the base, and the bag body is worked in the round. When the bag body is the desired height, some stitches are bound off, and the bag flap is worked back and forth. This easy project is a good introduction to both knitting in the round, and felting!


DIRECTIONS

Base
CO 25 sts.

Row 1: Sl 1, k to end.

Repeat this row 35 times more. There should be 18 slipped sts along each side edge of the work. After last row is worked, do not turn work.

Bag Body
Place marker on needle at end of last row to indicate beginning of round, pick up and k 18 sts (1 st in each slipped st) along adjacent side edge of bag, pick up and k 25 sts along CO edge, pick up and k 18 sts along remaining edge of work, k to marker. 86 sts on needle.

Work in the round in stockinette st until work measures 13 inches from edge of base.

Next Round: BO 61 sts, k to end. 25 sts remain.

Flap
K 4 rows.
Beginning with a P row, work in stockinette st until flap measures 7 inches.
BO all sts.


FINISHING

Weave in ends.

Felting
Place the bag in a pillowcase and tie it closed. Set your washing machine for hot wash/cold rinse, with a low water level and the maximum level of agitation.

Place the pillowcase in the washing machine, adding a small amount of detergent and a pair of old jeans or other heavy article of clothing, to provide additional agitation. Run the washing machine, checking progress regularly.

When the bag has reached the desired size and density, remove it from the machine and rinse it thoroughly. Shape it with your hands, folding it to resemble a paper lunch bag. Lay it flat and leave it to dry thoroughly (this may take a day or two).

Final Touches
Either cut a buttonhole in the flap (reinforce it by sewing around it, if you want) and sew a button to the bag underneath, or get yourself one of those snazzy purse clasps and attach it, following the manufacturer's directions.

Pattern & images © 2006 Frances Swiecki

Friday, March 20, 2009

Fabulous Felted Purse Patterns - Day 5 ~ The Little Coco Bag


I love that this bag is edged in the solid color yarn. I think it makes it look much classier with the extra detail in finishing.

Diane Sutliff says she "designed this simple pattern for knitters who were looking for a crisper look in a rectangle, pleat-top handbag. The base is firmer, the transition from base to body is neater and the contrasting colors give a more tailored finish. It is a collection of tips and ideas from knitting/felting colleagues." It is offered as a free pdf pattern download. Click for the Little Coco Bag pattern.

Thursday, March 19, 2009

Fabulous Felted Purse Patterns - Day 4 ~ Moda Dea Felted Bag

This cute felted bag is designed by Maria Cook and offered as a free internet pattern from the Moda Dea free knitting and crocheting patterns site. The tabs are added after the purse is knitted, so would be optional if you wanted a plain bag. I like the decorative "scarf" woven through the tabs and I don't see why that couldn't be interchangeable to match your mood. I see a lot of color possibilities.

Moda Dea Felted Bag

Finished bag measures approximately 8" high x 13" wide.

MODA DEA® "Cartwheel™": 5 Balls No. 9745
Raspberries CA.

MODA DEA® "Spellbound™": 1 Ball No. 2737 Guinevere
CB.

Circular Knitting Needles: 6mm [US 10] – 24"; 6.5mm [US
11] – 24".
Two Double Pointed Needles: 6mm [US 10].

Stitch markers, yarn needle, sewing needle and thread, 1 snap,
2 small beads; Optional: "Stick It Felt", 4 gold foot brads.

GAUGE: 14 sts = 4"; 18 rows = 4" in St st with 2 strands before felting. CHECK YOUR GAUGE. Use any size needle to obtain the gauge.

NOTE: Felting is not an exact science due to the many different variables, however up to 25% of the height and 15% of the width may be lost in the felting process.

BAG: With larger circular needle and two strands of CA held together, cast on 90 sts. Join and place a stitch marker on needle to mark beg of rnds. Knit 9 rnds. Purl one rnd. Now K 35 more rnds. Change to smaller circular needle and [Knit one rnd, Purl one rnd] 3 times. Bind off in Purl.

Fold bag flat and sew the bottom seam. With wrong side facing, open the bottom of the bag to the first Purl rnd at front and back of bag – approximately 2" on each side of seam. Triangular ends are formed at each end of the seam; fold the point of each triangle to the seam and stitch in place.

Flap: With double point needles and ONE strand CA, pick up and K9 sts on center back edge of bag. K each row until flap measures 4". Bind off.

Handles (Make 2): With double point needles and two strands of CA held together, cast on 5 sts. Knit 1 row. DO NOT TURN. * Slide sts to other end of needle, move needle to opposite hand without turning and Knit. Rep from * to form a tube until approximately 16" from beg. Bind off.

Sew each end of one handle to wrong side of bag about 2" in from each side edge. Repeat with remaining handle.

Tabs (Make 4): With double point needles and ONE strand CA, cast on 6 sts. K each row until 4" from beg. Bind off.

Sew tabs in place directly below handles and about 3" below top edge of bag, sewing down only the top and bottom of each tab strip to allow for "scarf" to weave through.

Weave in all loose ends.

Felting: Place assembled bag in the washing machine in the smallest load with hottest water setting and a small amount of liquid detergent through one wash (agitation only) cycle.
(Option: 1 tablespoon of baking soda in the wash may speed
the felting process.)
Remove bag and check on amount of felting during this process. Two or more wash cycles may be needed before you will be satisfied with the effect.
Repeat until pieces are felted and bag is desired size.

Rinse in cold water to stop the felting process and to remove
the soap.

Pull pieces into shape and allow to dry away from sun or heat for a day or two.

Felting will cause a certain amount of pilling which is easily removed by brushing briskly with a hard nylon brush.

Scarf: With larger needle and one strand CB, cast on 2 sts. Work back and forth in rows. K every row inc 1 st at each end of first 3 rows – 8 sts. Work even, K every row, until 40" from beg. Dec 1 st at each end of next 3 rows – 2 sts. Bind off leaving a 4" tail. Tie a knot close to finished edge, thread a bead onto tail and tie another knot to keep bead on the yarn. Trim ends. Repeat on beg yarn end. Weave finished scarf through tabs and tie in a bow.

Sew snap pieces in place to wrong side of flap and corresponding right side of bag front.

Optional: Cut "Stick It Felt" to the size of the bottom of the bag and apply according to manufacturer's directions. Attach foot brads according to manufacturer's directions.

Wednesday, March 18, 2009

Fabulous Felted Purse Patterns - Day 3 ~ Felted Skull Tote


Shiver me timbers! This tote would make a great bag for carrying knitting projects or just a fun bag to show the "dangerous" side of your personality. Pattern and photos are from Adrian Bizilia, who says "Print it, share it, link to it and enjoy it. Just don't take credit for it or sell it. Thank you."

Felted Skull Tote

Materials:

- MC-10 oz./ approx 500 yards worsted weight 100% wool yarn in your main color (black shown)

- CC- 2 oz./ approx. 100 yards worsted weight 100% wool yarn in contrast color (white shown)

I used vintage Coats and Clark's Red Heart 100% Virgin Wool 4 ply Knitting Worsted, but as long as you use worsted weight 100% wool you should have very similar results.

- One size 13 US circular, 32" long. I never had to switch to DPNs while decreasing for the bottom. I just pulled the excess needle cable out between two stitches at the back of the work. If you like, DPNs may be used for the latter decreases at the bottom and the i-cord.

- 4 stitch markers or scraps of contrasting yarn for this purpose

- tapestry needle to weave in ends

Size:
This pattern produces a tote approx. 17.5" x 14" before fulling and 13" tall by 10.5" wide, with 23" straps that fit nicely over the shoulder after fulling.

Download the pdf file pattern here.

Tuesday, March 17, 2009

Fabulous Felted Purse Patterns - Day 2 ~ Felted Purse

Day 2 of the Fabulous Felted Purse patterns is a classic bag. I've seen many variations of this pattern in different sizes and different colors of yarn. The pattern below is offered at Knitting Pattern Central as a free pattern. It's St Patrick's Day - knit one in GREEN!

Be sure to read the fine print at the bottom for copyright compliance.

Felted Purse


Materials:

2 balls Paton’s Classic Wool Any 100% wool yarn will do. Do not use a superwash wool as it will not felt. Colors matter. Light colors, white, aran, natural do not felt as well as darker colors.

16” circular needle size 10 ½
2 double pointed needles size 10 ½

Purse:

With two strands of yarn held together, cast on 34 stitches. Knit back and forth in garter stitch for 34 rows. Break and finish off one strand of yarn. Now with remaining strand of yarn continue by picking up 16 stitches down short side of piece. Place one of the 3 same color markers on needle. Pick up and knit 34 stitches along long side of piece. Place another of the same color markers on needle. Pick up and knit 16 stitches along remaining short side of piece and place last of the same color markers on needle. Knit across remaining 34 stitches. Place remaining marker. This marker marks not only the corner but the row. From now on you will be knitting in the round. Knit 56 rows.

Next round: *Knit 3, bind off 3, knit 4 (includes stitch on needle after bind off), bind off 3, knit 3 ( includes stitch on needle after bind off) Slip marker.*
**Knit 7, bind off 3, knit to last 10 stitches before marker, bind off 3, knit 7 (includes stitch on needle after bind off). Slip marker.**
Repeat * to * for next short side.
Repeat from ** to ** for remaining long side.
Next round: Knit around casting on 3 stitches over every 3 stitch bind off of previous row. Leave the row marker on your needle, but remove the other markers as you go.
Knit for 8 more rows. Bind off. Weave in ends on wrong side of work.

Handles:

Make 2. Handles are made in 5 stitch I cord. Cast 5 stitches on one of the double pointed needle. Do not turn. Push stitches down to working end of needle. Pull yarn across back of work and knit. Continue in this way, pushing the stitches down to a working position at the end of the needle and pulling the yarn across the back of work. Never turn work but always have the right side facing you. Make each I cord 36” long. Bind off.

Felting:

Put your finished pieces in a pillow slip or net bag. Note: This is highly recommended as it will keep your I cord from tying itself in knots as well as keep lint from clogging your filter. Set washing machine for the smallest load, hot water wash and cold water rinse. Add a bit of detergent. Put the bag in the machine and run through a complete cycle. Some recommend putting towels, jeans or some other heavy items in with piece to be felted. The friction of items rubbing together during the process is suppose to facilitate felting. I have never found this necessary. At the end of the cycle check the purse. If properly felted the fabric should be thick and firm. You should not be able to see the individual knit stitches on the sides of bag. (The ridges of the garter stitch bottom will still be visible.) If purse does not meet those standards return to machine and run through another cycle. This time, however, check the progress every five minutes. When the purse meets your criteria, advance the machine timer to rinse and complete the wash cycle. Remove purse. Begin to shape with your hands. Pull and stretch the wool until you are satisfied with the proportions. (Note: It is not possible to give definitive measurements as felting is not a precise process.) Hold the ends of the I cord and pull, stretching them to be sure they are the same length. Place pieces on a towel away from direct sunlight. Allow pieces to dry thoroughly.

Finishing:

Thread I cord through eyelets. Tie ends on each side in overhand knot. If necessary, adjust knots to insure handles are even. If you have used a yarn that got very fuzzy during the felting process you can trim the fuzzy ends if you wish.


Copyright 2006 Yvonne Boucher
This pattern is for your personal use only. It may not be reproduced for sale or to conduct classes. It may not be used to make purses for sale.

Monday, March 16, 2009

Fabulous Felted Purse Patterns - Day 1 ~ Felted Tab Bag & Pouch Pattern

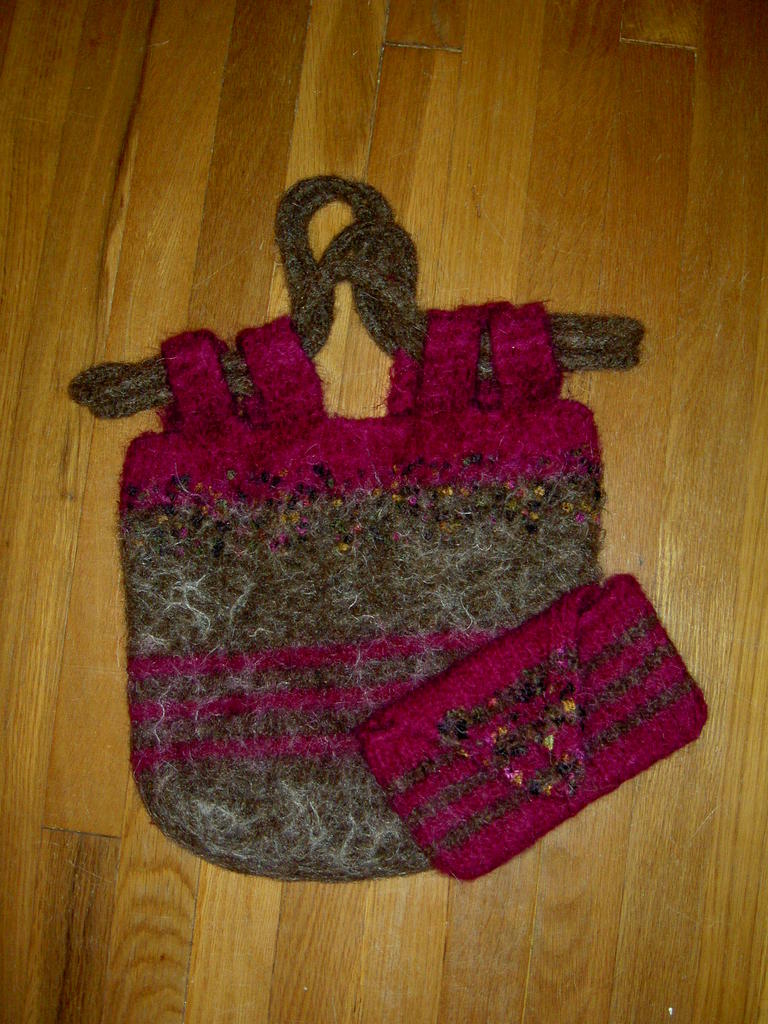
I figured it's time to check out some of those fabulous patterns for felted purses and bags. We'll start off the first day with the Felted Tab Bag and Pouch offered as a free downloadable internet pattern by Jeanne of Cleveland, OH. Her picture picture and pattern follow...love the colors!


Felted Tab Bag
Lamb’s Pride Bulky – 3 (or 4) skeins Sable, 2 (or 3) skeins Fuschia
Trendsetter’s Flora color #722 – 1 ball
Size 13 circular needles
Size 11 double pointed needles

Gauge is unimportant – this is just a bag!

Bottom of bag:
Cast on 40 stitches
Knit for 24 rows in garter stitch
Pick up 12 stitches evenly across the side of the rectangle to form the side of the bag, Pick up 40 stitches evenly across the cast on edge of the rectangle to form the front of the bag, Pick up 12 stitches evenly across the other side of the rectangle to form the other side of the bag.

Bag Body:
Join to begin knitting in the round, being careful not to twist stitches.
Knit 7 rounds Sable
Knit 3 rounds Fuschia
Knit 4 rounds Sable
Knit 3 rounds Fuschia
Knit 4 rounds Sable
Knit 3 rounds Fuschia
Knit 16 rounds Sable
Knit 8 rounds Sable & Flora
Knit 4 rounds Fuschia & Flora
Knit 7 rounds Fuschia
Last Row: Bind off 12, Knit 5, Bind off 5, Knit 5, Bind off 10, Knit 5, Bind off 5, Knit 5, Bind off 12, Knit 5, Bind off 5, Knit 5, Bind off 10, Knit 5, Bind off 5, Knit 5
Transfer remaining stitches to a stitch holder.

Bag Tabs:
For each of the 8 tabs remaining on the needle join new yarn.
Row 1: Knit 1, Knit into the front and back of stitch, Knit 1, Knit into the front and back of stitch,
Knit 1 – 7 sts on needle
Knit in garter stitch for 26 rows.
Bind off

Make 2, 30" long, 4 stitch I chords

Finishing:
Fold each tab in half. Sew end of tab to inside top of bag.
Thread 2 lengths of I chord through tabs
Sew end of each I chord together to form 2 continuous circles.

Felt.. Make sure that you felt this in a pillowcase!!!! The I chords can and will tangle in your agitator!


Matching Felted Pouch:
Leftover Lamb’s Pride Bulky in Fuschia & Sable
Leftover Trendsetter’s Flora color #722
Size 13 straight needles

Gauge is unimportant – this is just a bag!

Body of pouch:
Cast on 24 stitches in Fuschia
Knit 6 rows stockinet - Fuschia
Knit 2 rows stockinet - Sable
Knit 3 rows stockinet - Fuschia
Knit 2 rows stockinet – Sable
Knit 3 rows stockinet - Fuschia
Knit 2 rows stockinet – Sable
Knit 12 rows stockinet – Fuschia
Knit 2 rows stockinet - Sable
Knit 3 rows stockinet - Fuschia
Knit 2 rows stockinet – Sable
Knit 3 rows stockinet - Fuschia
Knit 2 rows stockinet – Sable
Knit 6 rows stockinet – Fuschia

Top flap:
Continue for remaining rows in decrease pattern:
Row 1 – Knit 2, SSK, K across to last 4 sts, K2tog, K2
Row 2 – Purl
Stripe pattern for decreases:
8 rows Fuschia & Flora
2 rows Sable & Flora
3 rows Fuschia & Flora
2 rows Sable & Flora
3 rows Fuschia & Flora
2 rows Sable & Flora
2 rows Fuschia & Flora
Bind off remaining stitches.

Finishing:
Fold body in half and sew side seams.
Felt in a pillowcase!
Line, add a snap closure at the point of the flap.

For a pdf version of Jeanne's pattern, click here.