Pinterest Hover Button

Showing posts with label free knitting pattern. Show all posts

Friday, March 20, 2009

Fabulous Felted Purse Patterns - Day 5 ~ The Little Coco Bag


I love that this bag is edged in the solid color yarn. I think it makes it look much classier with the extra detail in finishing.

Diane Sutliff says she "designed this simple pattern for knitters who were looking for a crisper look in a rectangle, pleat-top handbag. The base is firmer, the transition from base to body is neater and the contrasting colors give a more tailored finish. It is a collection of tips and ideas from knitting/felting colleagues." It is offered as a free pdf pattern download. Click for the Little Coco Bag pattern.

Wednesday, March 18, 2009

Fabulous Felted Purse Patterns - Day 3 ~ Felted Skull Tote


Shiver me timbers! This tote would make a great bag for carrying knitting projects or just a fun bag to show the "dangerous" side of your personality. Pattern and photos are from Adrian Bizilia, who says "Print it, share it, link to it and enjoy it. Just don't take credit for it or sell it. Thank you."

Felted Skull Tote

Materials:

- MC-10 oz./ approx 500 yards worsted weight 100% wool yarn in your main color (black shown)

- CC- 2 oz./ approx. 100 yards worsted weight 100% wool yarn in contrast color (white shown)

I used vintage Coats and Clark's Red Heart 100% Virgin Wool 4 ply Knitting Worsted, but as long as you use worsted weight 100% wool you should have very similar results.

- One size 13 US circular, 32" long. I never had to switch to DPNs while decreasing for the bottom. I just pulled the excess needle cable out between two stitches at the back of the work. If you like, DPNs may be used for the latter decreases at the bottom and the i-cord.

- 4 stitch markers or scraps of contrasting yarn for this purpose

- tapestry needle to weave in ends

Size:
This pattern produces a tote approx. 17.5" x 14" before fulling and 13" tall by 10.5" wide, with 23" straps that fit nicely over the shoulder after fulling.

Download the pdf file pattern here.

Tuesday, March 17, 2009

Fabulous Felted Purse Patterns - Day 2 ~ Felted Purse

Day 2 of the Fabulous Felted Purse patterns is a classic bag. I've seen many variations of this pattern in different sizes and different colors of yarn. The pattern below is offered at Knitting Pattern Central as a free pattern. It's St Patrick's Day - knit one in GREEN!

Be sure to read the fine print at the bottom for copyright compliance.

Felted Purse


Materials:

2 balls Paton’s Classic Wool Any 100% wool yarn will do. Do not use a superwash wool as it will not felt. Colors matter. Light colors, white, aran, natural do not felt as well as darker colors.

16” circular needle size 10 ½
2 double pointed needles size 10 ½

Purse:

With two strands of yarn held together, cast on 34 stitches. Knit back and forth in garter stitch for 34 rows. Break and finish off one strand of yarn. Now with remaining strand of yarn continue by picking up 16 stitches down short side of piece. Place one of the 3 same color markers on needle. Pick up and knit 34 stitches along long side of piece. Place another of the same color markers on needle. Pick up and knit 16 stitches along remaining short side of piece and place last of the same color markers on needle. Knit across remaining 34 stitches. Place remaining marker. This marker marks not only the corner but the row. From now on you will be knitting in the round. Knit 56 rows.

Next round: *Knit 3, bind off 3, knit 4 (includes stitch on needle after bind off), bind off 3, knit 3 ( includes stitch on needle after bind off) Slip marker.*
**Knit 7, bind off 3, knit to last 10 stitches before marker, bind off 3, knit 7 (includes stitch on needle after bind off). Slip marker.**
Repeat * to * for next short side.
Repeat from ** to ** for remaining long side.
Next round: Knit around casting on 3 stitches over every 3 stitch bind off of previous row. Leave the row marker on your needle, but remove the other markers as you go.
Knit for 8 more rows. Bind off. Weave in ends on wrong side of work.

Handles:

Make 2. Handles are made in 5 stitch I cord. Cast 5 stitches on one of the double pointed needle. Do not turn. Push stitches down to working end of needle. Pull yarn across back of work and knit. Continue in this way, pushing the stitches down to a working position at the end of the needle and pulling the yarn across the back of work. Never turn work but always have the right side facing you. Make each I cord 36” long. Bind off.

Felting:

Put your finished pieces in a pillow slip or net bag. Note: This is highly recommended as it will keep your I cord from tying itself in knots as well as keep lint from clogging your filter. Set washing machine for the smallest load, hot water wash and cold water rinse. Add a bit of detergent. Put the bag in the machine and run through a complete cycle. Some recommend putting towels, jeans or some other heavy items in with piece to be felted. The friction of items rubbing together during the process is suppose to facilitate felting. I have never found this necessary. At the end of the cycle check the purse. If properly felted the fabric should be thick and firm. You should not be able to see the individual knit stitches on the sides of bag. (The ridges of the garter stitch bottom will still be visible.) If purse does not meet those standards return to machine and run through another cycle. This time, however, check the progress every five minutes. When the purse meets your criteria, advance the machine timer to rinse and complete the wash cycle. Remove purse. Begin to shape with your hands. Pull and stretch the wool until you are satisfied with the proportions. (Note: It is not possible to give definitive measurements as felting is not a precise process.) Hold the ends of the I cord and pull, stretching them to be sure they are the same length. Place pieces on a towel away from direct sunlight. Allow pieces to dry thoroughly.

Finishing:

Thread I cord through eyelets. Tie ends on each side in overhand knot. If necessary, adjust knots to insure handles are even. If you have used a yarn that got very fuzzy during the felting process you can trim the fuzzy ends if you wish.


Copyright 2006 Yvonne Boucher
This pattern is for your personal use only. It may not be reproduced for sale or to conduct classes. It may not be used to make purses for sale.

Monday, March 16, 2009

Fabulous Felted Purse Patterns - Day 1 ~ Felted Tab Bag & Pouch Pattern

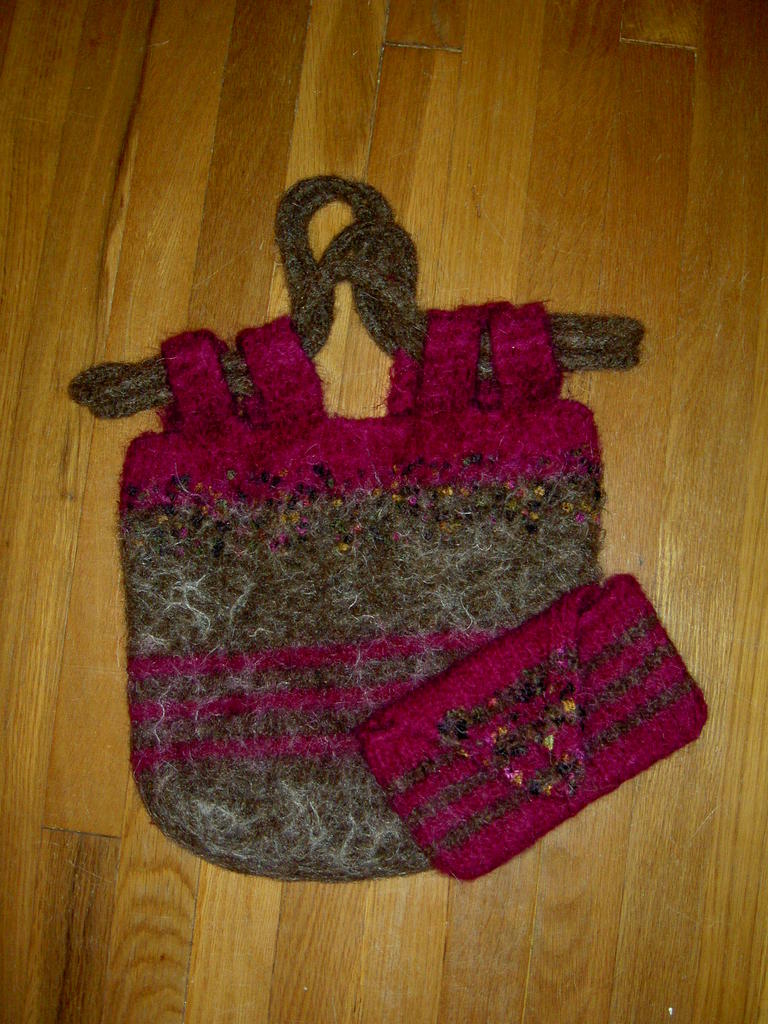
I figured it's time to check out some of those fabulous patterns for felted purses and bags. We'll start off the first day with the Felted Tab Bag and Pouch offered as a free downloadable internet pattern by Jeanne of Cleveland, OH. Her picture picture and pattern follow...love the colors!


Felted Tab Bag
Lamb’s Pride Bulky – 3 (or 4) skeins Sable, 2 (or 3) skeins Fuschia
Trendsetter’s Flora color #722 – 1 ball
Size 13 circular needles
Size 11 double pointed needles

Gauge is unimportant – this is just a bag!

Bottom of bag:
Cast on 40 stitches
Knit for 24 rows in garter stitch
Pick up 12 stitches evenly across the side of the rectangle to form the side of the bag, Pick up 40 stitches evenly across the cast on edge of the rectangle to form the front of the bag, Pick up 12 stitches evenly across the other side of the rectangle to form the other side of the bag.

Bag Body:
Join to begin knitting in the round, being careful not to twist stitches.
Knit 7 rounds Sable
Knit 3 rounds Fuschia
Knit 4 rounds Sable
Knit 3 rounds Fuschia
Knit 4 rounds Sable
Knit 3 rounds Fuschia
Knit 16 rounds Sable
Knit 8 rounds Sable & Flora
Knit 4 rounds Fuschia & Flora
Knit 7 rounds Fuschia
Last Row: Bind off 12, Knit 5, Bind off 5, Knit 5, Bind off 10, Knit 5, Bind off 5, Knit 5, Bind off 12, Knit 5, Bind off 5, Knit 5, Bind off 10, Knit 5, Bind off 5, Knit 5
Transfer remaining stitches to a stitch holder.

Bag Tabs:
For each of the 8 tabs remaining on the needle join new yarn.
Row 1: Knit 1, Knit into the front and back of stitch, Knit 1, Knit into the front and back of stitch,
Knit 1 – 7 sts on needle
Knit in garter stitch for 26 rows.
Bind off

Make 2, 30" long, 4 stitch I chords

Finishing:
Fold each tab in half. Sew end of tab to inside top of bag.
Thread 2 lengths of I chord through tabs
Sew end of each I chord together to form 2 continuous circles.

Felt.. Make sure that you felt this in a pillowcase!!!! The I chords can and will tangle in your agitator!


Matching Felted Pouch:
Leftover Lamb’s Pride Bulky in Fuschia & Sable
Leftover Trendsetter’s Flora color #722
Size 13 straight needles

Gauge is unimportant – this is just a bag!

Body of pouch:
Cast on 24 stitches in Fuschia
Knit 6 rows stockinet - Fuschia
Knit 2 rows stockinet - Sable
Knit 3 rows stockinet - Fuschia
Knit 2 rows stockinet – Sable
Knit 3 rows stockinet - Fuschia
Knit 2 rows stockinet – Sable
Knit 12 rows stockinet – Fuschia
Knit 2 rows stockinet - Sable
Knit 3 rows stockinet - Fuschia
Knit 2 rows stockinet – Sable
Knit 3 rows stockinet - Fuschia
Knit 2 rows stockinet – Sable
Knit 6 rows stockinet – Fuschia

Top flap:
Continue for remaining rows in decrease pattern:
Row 1 – Knit 2, SSK, K across to last 4 sts, K2tog, K2
Row 2 – Purl
Stripe pattern for decreases:
8 rows Fuschia & Flora
2 rows Sable & Flora
3 rows Fuschia & Flora
2 rows Sable & Flora
3 rows Fuschia & Flora
2 rows Sable & Flora
2 rows Fuschia & Flora
Bind off remaining stitches.

Finishing:
Fold body in half and sew side seams.
Felt in a pillowcase!
Line, add a snap closure at the point of the flap.

For a pdf version of Jeanne's pattern, click here.

Thursday, February 12, 2009

10 Favorite Free Sock Patterns ~ Day 3

Caspian Sea Socks


When I saw these socks pictured on the Knitting Daily online pattern site, I knew they had to jump to the top of my sock queue. I ordered the different colors of yarn and am armed with needles. This will be a project for our Cozumel vacation next week. I like to take something small to work on for plane rides and this will be perfect.

The pattern, designed by Priscilla Gibson-Roberts, is available as a free pattern on the Knitting Daily website. The Knitting Daily website often publishes free patterns, but you need to download them when you see them, as they don't stay on the site forever. The pattern is available from the Knitting Daily free pattern library here or their pdf file can be downloaded here.


Friday, January 9, 2009

Recently finished knitting projects

Time to show pics of my recently finished knitting projects......

First is the Grey Gardens Wrap by Kay Graves of Savannah Cottage. I left off the ruffle that was supposed to go all around the edge. I thought the wrap was more versatile without it. Not sure I love how it drapes on me, but it's warm and cozy and very soft. Maybe I just need some practice in "wrapping." This one is a free pattern offered as a downloadable pdf file - http://mysavannahcottage.files.wordpress.com/2008/03/grey-gardens-pdf.pdf


I've also whipped up a pair of mittens this week. These were made to coordinate with my diamond modular scarf that I had made with Artyarns supermerino (see post "A Week of Scarves - Day 6) I used the leftover Artyarns yarn from my scarf, along with a soft lavender yarn for these mittens. This is a mittens pattern by Sarah Annexstad called Tam Mittens (available at my LYS - www.thetangledskein.com) They actually look better using a self-striping Noro for the accent color, but I wanted to match the scarf so I used the Artyarns leftover yarn.


Finally, I've done another pair of socks. These are nothing fancy, just plain old ribbed socks, but they are the perfect color for wearing with blue jeans. I always knit my socks on two circulars and often follow a pattern that I got as a handout, only changing the pattern ribbing section to either stockinette, ribbing, or baby cables.

Monday, January 5, 2009

Shorty Hand Warmers

These shorty hand warmers are knit with a worsted or bulky yarn. I used Ella Rae Jaspe' Wool in color 03 for the multi-colored ones. The yarn comes in 50 gram balls, with 88 yards to the skein. One skein makes a set of these fingerless gloves with plenty of yarn left over to add length to the wrist if you prefer a longer version. The purple ones are knit up with Elsebeth Lavold's Silky Flamme designer's choice, color 020 lavender. This is a 50g ball with 82 yards of yarn. No extra yarn here, as I finished with barely a foot of yarn left over.

They knit up really fast - a one day project for me. I adapted a mitten pattern to make these cozy little hand warmers. Adjusting the basic mitten pattern was done by adding a couple of thumb stitches and binding off before the thumb and hand decreases.


Easy Knit ~ Shorty Hand Warmers Pattern

Materials: A set of US 7 double point needles or two US 7 24" circular needles (worsted weight) or US 8 double point needles or two US 8 24" circular needles (bulky weight) & one skein of bulky or worsted weight yarn.


Directions:
Cast on 28 stitches. Divide stitches onto 3 dp needles or 2 circular needles. Join for working in the round.

Knit 16 rounds

Thumb Gussett
On the next round, K1, place marker, M1, K1, M1, place marker, knit to the end of the round (increase 2 stitches).
Knit 2 rounds

Increase Round
* K1, slip marker, M1, knit to next marker, M1, slip marker, knit to end of round.
Knit 2 rounds *

Repeat from * to * two more times until you have 36 stitches total and 9 stitches between your markers for the thumb.

K1, remove 1st marker, place 9 thumb stitches on a stitch holder, remove 2nd marker, cast on 1 stich, knit to the end. (28 stitches)

Hand
Knit about 14 rounds, ending at the length desired. If you like the rolled look, make sure the length allows for the roll. Bind off loosely.

Thumb
Arrange the 9 thumb stitches on 2 dp needles or 2 circular needles and join with RS facing to beginning of first needle. Using a 3rd dp needle or one of your circular needles, pick up and knit 4 stitches in the thumb gap. (13 stitches). Join for working in the round. Knit about 8 rounds, ending at the length desired. Bind off loosely.

Sunday, January 4, 2009

A Week of Scarves! Day 7 - Basic Sampler Scarf

Whew! Day 7 of the week of scarves! I haven't made this one yet, but this will be by next scarf project. It's a basic sampler scarf from Lion Brand yarn. They offer this free pattern with photo on their website. Looks like a good way to learn several different pattern stitches and combine them in one simple project.

Basic Sampler Scarf

Lion Brand® Wool-Ease®

Materials:

Size: One Size
6 x 56 in. (15 x 142 cm)

2 skeins yarn

Size US 9 needles or needle size to give correct gauge

Gauge:

17 stitches and 24 rows = 4 in. (10 cm) in Stockinette stitch (knit on right side, purl on wrong side). BE SURE TO CHECK YOUR GAUGE. When you match the gauge in a pattern, your project will be the size specified in the pattern and the materials specified in the pattern will be sufficient. If it takes you fewer stitches and rows to make a 4 in. [10 cm] square, try using a smaller size hook or needles; if more stitches and rows, try a larger size hook or needles.

SCARF

Cast on 26 stitches.

Rows 1-6:
Knit.
Row 7: Knit 3, *knit 1, purl 1; repeat from * to last 3 stitches (for Seed Stitch pattern), knit 3.
Row 8: Knit 3, (knit the purl stitches and purl the knit stitches) to last 3 stitches, knit 3.
Rows 9-22: Repeat Rows 7 and 8 seven times.
Rows 23-27: Knit.
Row 28: Knit 3, knit 4, *purl 4, knit 4; repeat from * to last 3 stitches (for Basketweave), knit 3.
Row 29: Knit 3, purl 4, *knit 4, purl 4; repeat from * to last 3 stitches, knit 3.
Rows 30 and 31: Repeat Rows 28 and 29.
Row 32: Knit.
Rows 33-36: Repeat Rows 28 and 29 twice.
Rows 37-41: Repeat Rows 32-36.
Row 42-46: Knit.
Row 47: Knit 3, *purl 2, knit 1; repeat from * to last 5 stitches (for Ridge Stitch), purl 2, knit 3.
Row 48: Knit.
Rows 49-62: Repeat Rows 47 and 48 seven times.
Rows 63-66: Knit.
Row 67: Knit 3, *knit 4, purl 6; repeat from * to last 3 stitches (for Track Stitch), knit 3.
Row 68: Knit 3, purl 20, knit 3.
Row 69: Knit.
Row 70: Knit 3, purl 20, knit 3.
Row 71: Knit 3, *purl 5, knit 4, purl 1; repeat from * to last 3 stitches, knit 3.
Rows 72-74: Repeat Rows 68-70.
Rows 75-79: Repeat Rows 67-71.
Row 80-82: Repeat Rows 68-70.
Rows 83-86: Knit.
Row 87-326: Repeat Rows 7-86 three more times.
Rows 327-332: Knit.

Bind off.

FINISHING

Weave in ends.

Friday, January 2, 2009

A Week of Scarves! Day 5 - Palindrome - A Reversible Cable Scarf


This scarf is easy to make, a great beginner cable scarf, and is reversible. How cool is that? This is a design from Kristin Bellenhumeur, inspired by the Irish Hiking Scarf pattern, and is is now available as a free internet pattern (see fine print at the bottom of this post for copyright usage compliance.) Named Palindrome, which means a line that reads the same forwards or backwards. Clever.

Palindrome - A Reversible Cable Scarf

Materials: Approximately 385 yards worsted weight yarn
Size 9 needles, or size recommended for yarn
Cable needle
Scarf measures approximately 4.5" x 64"

Directions:
Cast on 40 sts using your favorite cast-on method

Row 1: (RS) *K2, P2* across
Row 2, 3, and 4: Repeat Row 1
Row 5: (RS) *K2, P2, C8F* Repeat to last 4 sts, K2, P2
Row 6: Repeat Row 1

Repeat rows 1-6 for desired length, ending with row 4.
Bind off in K2, P2 pattern.

***KEY*** Very important for reversible cables!
C8F: Slip 4 sts to a cable needle and hold to front, K2, P2, then K2, P2 from the cable needle.

Credits: Original design was inspired byHello Yarn's Irish Hiking Scarf pattern.
Modified, renamed and republished with permission. All content © Kristin Bellehumeur. All rights reserved.You may print this pattern for personal, non profit use, as long as it is printed from www.cometosilver.com. And yes, you may sell your knitted, super cool reversible cable scarf! But it's better as a gift. ;)

Thursday, January 1, 2009

A Week of Scarves! Day 4 - Yellow and Gray Tweed Scarf


For this tweed scarf I used size 10 needles and a chunkier yarn. Smaller needles and lighter weight yarn gives this a totally different look. A friend gave me this pattern that she had printed from the internet. I'm not sure of the official name for this scarf pattern or who to credit for the pattern, but it's a great little scarf.


Yellow and Gray Tweed Scarf Pattern
Materials: Size 10 needles, approximately 400 yards of yarn
Finished size is 5" across and about 50" long.

Cast on 24 stitches.

Row 1: (K4, P4) 3 times across row.
Row 2: P1 (K4, P4) 2 times across row, end with K4, P3
Row 3: K2 (P4, K4) 2 times across row, end with P4, K2
Row 4: P3 (K4, P4) 2 times across row, end with K4, P1
Row 5: (P4, K4) 3 times across
Row 6: K1 (P4, K4) 2 times across row, end with P4, K3
Row 7: P2 (K4, P4) 2 times across row, end with K4, P2
Row 8: K3 (P4, K4) 2 times across row, end with P4, K1

Repeat these 8 rows, ending with row 8. Bind off.

Wednesday, December 31, 2008

A Week of Scarves! Day 3 - Ribs and Ruffles Scarf


This scarf knits up on big needles really fast and is done with one skein of Misti Chunky yarn. The little ruffle at the ends gives this a nice feminine look.

Ribs and Ruffles Scarf

Materials: 1 skein Misti Chunky Baby Alpaca, Size 13 Needles
Finished size: 48" x 5"

Directions:
Cast on 60 stitches.

Ruffle Row One: K2Tog across row (you will now have 30 stitches)
Ruffle Row Two: K2Tog across row (you will now have 15 stitches)

Begin Rib pattern.
Row One Rib Pattern: *K3, bring yarn forward, slip stitch as if to purl, bring yarn back, repeat pattern from *, end row with K3.
Row Two Rib Pattern: K1, bring yarn forward, slip stitch as if to purl, bring yarn back *K3, bring yarn forward, slip stitch as if to purl, bring yarn back, repeat pattern from *, end row with K1.
Continue rib pattern until you have approximately 8 yards left on skein. Begin ending ruffle pattern.

Ending Ruffle Pattern Row One:
K into front and back of each stitch in row (you will now have 30 stitches)
Ending Ruffle Pattern Row Two: Knit into front and back of each stitch in row (you will now have 60 stitches)
Bind off with similar tension to cast on row.

I've also made this scarf where I have doubled the width and added length to make this a more "winter hearty" scarf.

Tuesday, December 30, 2008

A Week of Scarves! Day 2 - Knitted Lengthwise Scarf

Knitting this scarf is a wonderful way to use up your scraps of yarn or to match the yarn you've used in a hat or mittens. It is knit lengthwise and can be done in a woven stitch, a seed stitch, box stitch, or moss stitch. The examples in the photos are all done with the woven stitch, which produce a woven look on the right side and a seed stitch on the wrong side.

Knitted Lengthwise Scarf Pattern

Materials:
Needle: Size appropriate for your yarn and desired guage (I used a size 4 needle, 60" long circular)
Yarn: Approximately 6 yards of yarn per row, if allowing for fringe. About 400 yards of yarn for the finished scarf.
Guage: 4 to 4 1/2 stitches per inch in worsted weight garter stitch, 6 stitches per inch in sport/DK weight garter stitch.
Finished Size: 5" x 42"


Number of Cast-on Stitches
Stitches/inch 4.0
40" length 160

45" length 180

50" length 200

55" length 220

60" length 240


Stitches/inch 4.5
40" length 180

45" length 203

50" length 225

55" length 248

60" length 270


Stitches/inch 5.0

40" length 200

45" length 225

50" length 250

55" length 275

60" length 300


Stitches/inch 5.5

40" length 220

45" length 248

50" length 275

55" length 303

60" length 330


Woven Stitch
Over an odd number of stitches or multiples of 4 + 1

Row 1 (RS) K1, *yf, sl 1 purlwise, yb, K1. Rep from * to end.
Row 2 (WS) P2, *yb, sl 1 purlwise, yf, P1. Rep from * to last stitch, P1.
Repeat these two rows.


If you would like a fringe, you can change yarn every row or just cut and start a new piece of yarn at every row. Leave a long tail at the beginning and end of each row.

Bind off and weave in ends. Trim fringe. I braided my fringe for a different look.

Monday, December 29, 2008

A Week of Scarves! Day 1 - Irish Hiking Scarf


Living in Minnesota certainly has it's disadvantages when it comes to wintery weather. I tend to make a LOT of scarves. It's really not a fetish, just practical. I decided that this week I would showcase a week of my favorite scarves. The first one is the Irish Hiking Scarf, pattern by Adrian Bazilia. This was first published in Hello Yarn and is now available as a free internet pattern (see fine print at the bottom of this post for copyright usage compliance.) It's a great beginning cabling project - easy and fun!

Irish Hiking Scarf

Materials:
Size US 8 needles and a cable needle
350 yards of worsted weight yarn
Finished size approximately 5 1/2" x 55"

Pattern:

Cast on 42 stitches.

Row 1. (WS) K2, P2, K2, P6, K2, P2, K2, P6, K2, P2, K2, P6, K2, P2, K2
Row 2. (RS) K4, P2, K6, P2, K2, P2, K6, P2, K2, P2, K6, P2, K4
Row 3. (WS) repeat row 1
Row 4. (RS) repeat row 2
Row 5. (WS) repeat row 1.
Row 6. (RS) repeat row 2.
Row 7. (WS) repeat row 1.
Row 8. (RS) K4, P2, C6F, P2, K2, P2, C6F, P2, K2, P2, C6F, P2, K4

Repeat these rows to desired length, ending on row 7. Bind off.

Key:

C6F = Slip 3 sts. onto a cable needle and hold to front of work. K3, then K the 3 sts. off cable needle. 

The Key are directions for making the cable, identified by C6F

Hello Yarn Credits: All content © Hello Yarn. All rights reserved. These patterns are for personal and non-profit use only. This means you can knit for yourself, for a gift, for charity, or for a charity auction/sale. You can print out the patterns for friends, if you wish, as long as you print straight from my site so the copyright information is intact. You may not sell items made from these patterns for profit or give these patterns away in your store to sell yarn. Visit www.helloyarn.com for more patterns.