


MATERIALS
5 skeins Noro Kureyon [100% wool; 100m per 50g skein]; colorways 124 and 128
1 US size 10 [6mm]circular needle [or size to obtain gauge]
2 bamboo purse handles
stitch markers
GAUGE
13 sts and 26 rows = 4" in garter stitch.
SIZE
15 x 15 x 5 inches prior to felting
9 x 11 x 3.5 inches after felting

DIRECTIONS
The purse is worked in one piece beginning with the bottom. The diagram below shows the order in which the mitered squares that make up the bag are knit. Mitered squares are worked all in garter stitch. Even rows are worked plain, On each odd row, a double decrease is worked at the center -- this creates the square.
BOTTOM OF BAG
Cast on 32 sts using a knitted or cable cast on.
SMALL SQUARE
Row 1: K14, K2tog, place marker, K2tog, K14.
Row 2 and all following even rows: Knit.
Row 3 and all following odd rows: Knit to 2 sts before marker, K2tog, slip marker, K2tog, knit to end of row.
When 2 sts remain, remove marker and K2tog. Do not bind off last stitch.
To work second small square:
From the live stitch, pick up 15 more stitches along one side of the square [one stitch per garter ridge]. 16 sts on needle. Cast on 16 additional stitches using cable cast on -- 32 sts.
Work these 32 sts to create a second small square.
Repeat this process once again to create a third square in line with the first two.

FRONT AND BACK OF BAG
Beginning with the remaining live stitch, pick up 23 additional stitches along one long side of the bag's bottom, one stitch per garter row. The last stitch you picked up should be at the center of the piece. Cast on an additional 24 stitches [48 sts on needle].
Work the large square as you did the small one:
LARGE SQUARE
Row 1: K22, K2tog, place marker, K2tog, K22.
Row 2 and all even rows: Knit
Row 3 and all remaining odd rows: K to 2 sts before marker, K2tog, slip marker, K2tog, K to end of row.
Work a second large square above the first. This time, break yarn and pull through last st to secure.
Go back to the bottom of the bag and pick up 24 sts along the bottom of bag and 24 sts along the first large square. Work these 48 sts as described for the large square.
When this square is finished, work another above it to complete the first side of the bag. Break yarn and secure it by pulling through the last stitch.
Work the back as you did the front with 4 large squares. Referring again to the diagram for the order of squares.

SIDES OF BAG
The sides of the bag are worked in double-mitered squares which look like U shapes. The technique is very similar to the technique used above.
Beginning at the point where the bottom and front of the bag meet, count back 16 garter ridges from the bottom of the bag. Pick up 16 sts from the front of the bag, 16 sts along the bottom of the bag and 16 sts from the back of the bag.
Row 1: K14, k2tog, place marker,k2tog, k12, k2tog place marker, k2tog, k14.
Row 2 and all even rows: Knit.
Row 3 and all remaining odd rows: K to 2 sts before first marker, k2tog, slip marker, k2tog, knit to 2 sts before second marker k2tog, slip marker, k2tog, k to end of row.
When there are no longer any stitches left between the two markers, K 1 even row, then use a three needle bind off to seam remaining sts together. Break yarn and secure.
Work a second and third U above the first. The third U should come to the top of the bag.
Work the second side panel the same on the remaining side.
FINISHING
Decide which is the wrong side of the bag and work in all ends on the wrong side.
If desired, pick up 128 sts along the top of the bag (one for each stitch or garter ridge) and knit a couple of rows, then bind off loosely.
FELTING
Place finished bag in a zipped laundry bag and toss into the washer with a pair of old jeans. Put washer on "hot", "small load" and "heavy duty" settings. I ran mine through the wash cycle twice and allowed the bag to be spun out.
Block bag on appropriately sized box. and allow to dry thoroughly. This may take a couple of days.
Sew handles in place with appropriately colored heavy duty thread or yarn. Noro Kureyon is not particularly strong, so it may not be the best choice for sewing on the handles.

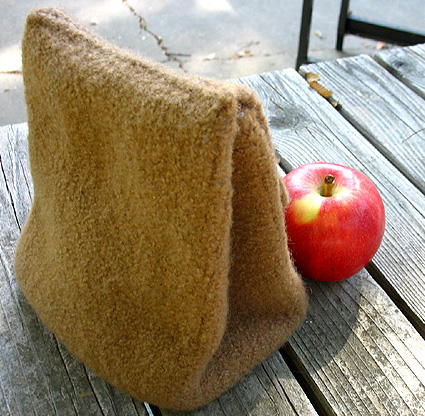
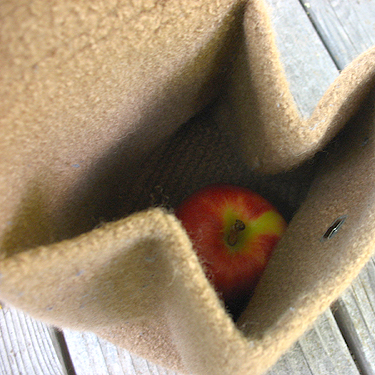
 Now here's a creative idea for a lunch bag! This little bag was designed by a high school student and is offered as a free pattern at knitty.com.
| SIZE | |
| One (comfortably fits a sandwich, cupcake, juice box, and small bottle of aspirin) | |
| FINISHED MEASUREMENTS | |
Before Felting After Felting | |
| MATERIALS | |
| |
| |
| GAUGE | |
| Approx. 12 sts = 4 inches in stockinette stitch. Exact gauge is not important for this project. | |
| PATTERN NOTES | |
The base of this bag is worked back and forth in garter stitch, then stitches are picked up around the circumference of the base, and the bag body is worked in the round. When the bag body is the desired height, some stitches are bound off, and the bag flap is worked back and forth. This easy project is a good introduction to both knitting in the round, and felting! | |
| DIRECTIONS | |
|
Row 1: Sl 1, k to end. Repeat this row 35 times more. There should be 18 slipped sts along each side edge of the work. After last row is worked, do not turn work. Bag Body Work in the round in stockinette st until work measures 13 inches from edge of base. Next Round: BO 61 sts, k to end. 25 sts remain. Flap | |
| FINISHING | |
|
Felting Place the pillowcase in the washing machine, adding a small amount of detergent and a pair of old jeans or other heavy article of clothing, to provide additional agitation. Run the washing machine, checking progress regularly. When the bag has reached the desired size and density, remove it from the machine and rinse it thoroughly. Shape it with your hands, folding it to resemble a paper lunch bag. Lay it flat and leave it to dry thoroughly (this may take a day or two). Final Touches Pattern & images © 2006 Frances Swiecki |

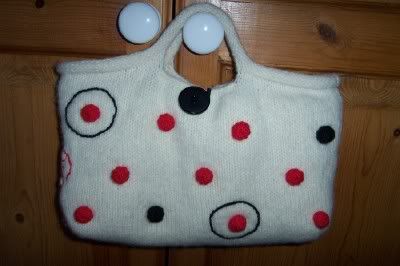
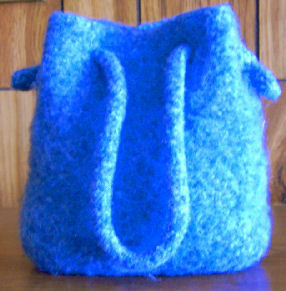
 This cute felted bag is designed by Maria Cook and offered as a free internet pattern from the Moda Dea free knitting and crocheting patterns site. The tabs are added after the purse is knitted, so would be optional if you wanted a plain bag. I like the decorative "scarf" woven through the tabs and I don't see why that couldn't be interchangeable to match your mood. I see a lot of color possibilities.
 Finished bag measures approximately 8" high x 13" wide.
MODA DEA® "Cartwheel™": 5 Balls No. 9745
Raspberries CA.
MODA DEA® "Spellbound™": 1 Ball No. 2737 Guinevere
CB.
Circular Knitting Needles: 6mm [US 10] – 24"; 6.5mm [US
11] – 24".
Two Double Pointed Needles: 6mm [US 10].
Stitch markers, yarn needle, sewing needle and thread, 1 snap,
2 small beads; Optional: "Stick It Felt", 4 gold foot brads.
![]()
GAUGE: 14 sts = 4"; 18 rows = 4" in St st with 2 strands before felting. CHECK YOUR GAUGE. Use any size needle to obtain the gauge.
![]()
NOTE: Felting is not an exact science due to the many different variables, however up to 25% of the height and 15% of the width may be lost in the felting process.
BAG: With larger circular needle and two strands of CA held together, cast on 90 sts. Join and place a stitch marker on needle to mark beg of rnds. Knit 9 rnds. Purl one rnd. Now K 35 more rnds. Change to smaller circular needle and [Knit one rnd, Purl one rnd] 3 times. Bind off in Purl.
Fold bag flat and sew the bottom seam. With wrong side facing, open the bottom of the bag to the first Purl rnd at front and back of bag – approximately 2" on each side of seam. Triangular ends are formed at each end of the seam; fold the point of each triangle to the seam and stitch in place.
Flap: With double point needles and ONE strand CA, pick up and K9 sts on center back edge of bag. K each row until flap measures 4". Bind off.
Handles (Make 2): With double point needles and two strands of CA held together, cast on 5 sts. Knit 1 row. DO NOT TURN. * Slide sts to other end of needle, move needle to opposite hand without turning and Knit. Rep from * to form a tube until approximately 16" from beg. Bind off.
Sew each end of one handle to wrong side of bag about 2" in from each side edge. Repeat with remaining handle.
Tabs (Make 4): With double point needles and ONE strand CA, cast on 6 sts. K each row until 4" from beg. Bind off.
Sew tabs in place directly below handles and about 3" below top edge of bag, sewing down only the top and bottom of each tab strip to allow for "scarf" to weave through.
Weave in all loose ends.
Felting: Place assembled bag in the washing machine in the smallest load with hottest water setting and a small amount of liquid detergent through one wash (agitation only) cycle.
(Option: 1 tablespoon of baking soda in the wash may speed
the felting process.)
Remove bag and check on amount of felting during this process. Two or more wash cycles may be needed before you will be satisfied with the effect.
Repeat until pieces are felted and bag is desired size.
Rinse in cold water to stop the felting process and to remove
the soap.
Pull pieces into shape and allow to dry away from sun or heat for a day or two.
Felting will cause a certain amount of pilling which is easily removed by brushing briskly with a hard nylon brush.
Scarf: With larger needle and one strand CB, cast on 2 sts. Work back and forth in rows. K every row inc 1 st at each end of first 3 rows – 8 sts. Work even, K every row, until 40" from beg. Dec 1 st at each end of next 3 rows – 2 sts. Bind off leaving a 4" tail. Tie a knot close to finished edge, thread a bead onto tail and tie another knot to keep bead on the yarn. Trim ends. Repeat on beg yarn end. Weave finished scarf through tabs and tie in a bow.
Sew snap pieces in place to wrong side of flap and corresponding right side of bag front.
Optional: Cut "Stick It Felt" to the size of the bottom of the bag and apply according to manufacturer's directions. Attach foot brads according to manufacturer's directions.
![]()

Materials:
- MC-10 oz./ approx 500 yards worsted weight 100% wool yarn in your main color (black shown)
- CC- 2 oz./ approx. 100 yards worsted weight 100% wool yarn in contrast color (white shown)
I used vintage Coats and Clark's Red Heart 100% Virgin Wool 4 ply Knitting Worsted, but as long as you use worsted weight 100% wool you should have very similar results.
- One size 13 US circular, 32" long. I never had to switch to DPNs while decreasing for the bottom. I just pulled the excess needle cable out between two stitches at the back of the work. If you like, DPNs may be used for the latter decreases at the bottom and the i-cord.
- 4 stitch markers or scraps of contrasting yarn for this purpose
- tapestry needle to weave in ends
Size:
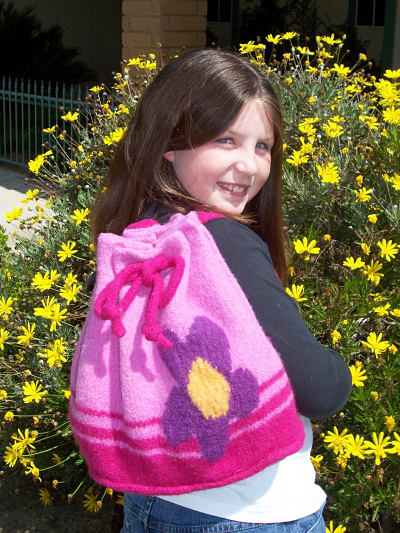
This pattern produces a tote approx. 17.5" x 14" before fulling and 13" tall by 10.5" wide, with 23" straps that fit nicely over the shoulder after fulling.
Download the pdf file pattern here.

Gauge is unimportant – this is just a bag!
Bottom of bag:
Cast on 40 stitches
Knit for 24 rows in garter stitch
Pick up 12 stitches evenly across the side of the rectangle to form the side of the bag, Pick up 40 stitches evenly across the cast on edge of the rectangle to form the front of the bag, Pick up 12 stitches evenly across the other side of the rectangle to form the other side of the bag.
Bag Body:
Join to begin knitting in the round, being careful not to twist stitches.
Knit 7 rounds Sable
Knit 3 rounds Fuschia
Knit 4 rounds Sable
Knit 3 rounds Fuschia
Knit 4 rounds Sable
Knit 3 rounds Fuschia
Knit 16 rounds Sable
Knit 8 rounds Sable & Flora
Knit 4 rounds Fuschia & Flora
Knit 7 rounds Fuschia
Last Row: Bind off 12, Knit 5, Bind off 5, Knit 5, Bind off 10, Knit 5, Bind off 5, Knit 5, Bind off 12, Knit 5, Bind off 5, Knit 5, Bind off 10, Knit 5, Bind off 5, Knit 5
Transfer remaining stitches to a stitch holder.
Bag Tabs:
For each of the 8 tabs remaining on the needle join new yarn.
Row 1: Knit 1, Knit into the front and back of stitch, Knit 1, Knit into the front and back of stitch,
Knit 1 – 7 sts on needle
Knit in garter stitch for 26 rows.
Bind off
Make 2, 30" long, 4 stitch I chords
Finishing: 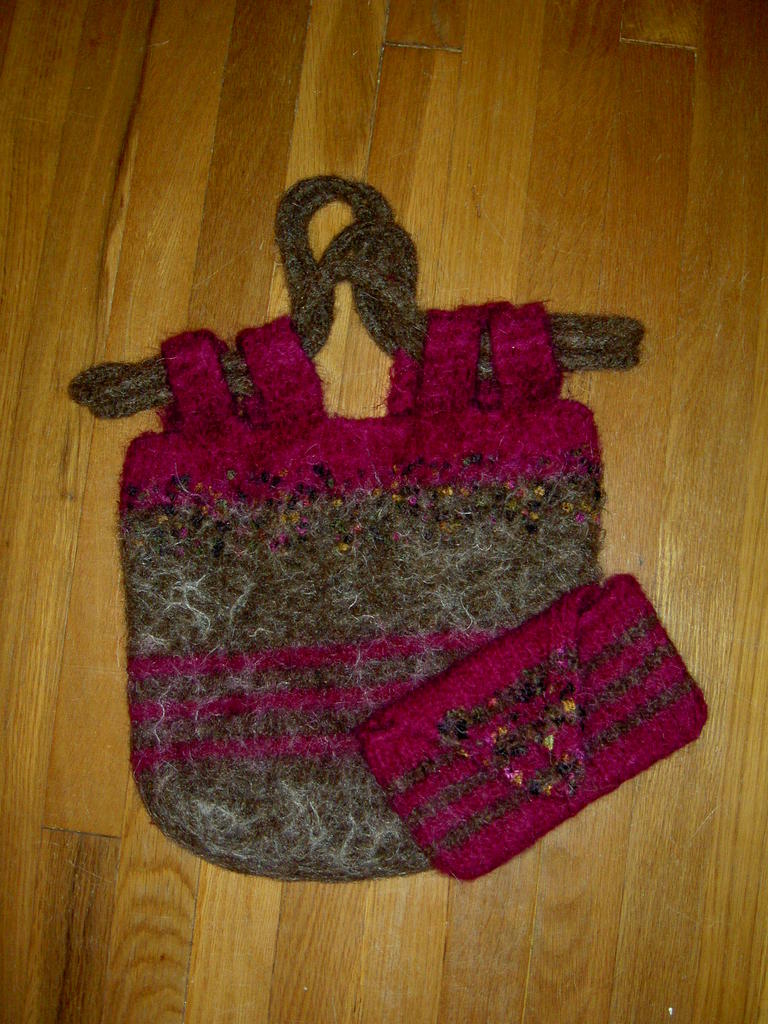
Fold each tab in half. Sew end of tab to inside top of bag.
Thread 2 lengths of I chord through tabs
Sew end of each I chord together to form 2 continuous circles.
Felt.. Make sure that you felt this in a pillowcase!!!! The I chords can and will tangle in your agitator!
Matching Felted Pouch:
Leftover Lamb’s Pride Bulky in Fuschia & Sable
Leftover Trendsetter’s Flora color #722
Size 13 straight needles
Gauge is unimportant – this is just a bag!
Body of pouch:
Cast on 24 stitches in Fuschia
Knit 6 rows stockinet - Fuschia
Knit 2 rows stockinet - Sable
Knit 3 rows stockinet - Fuschia
Knit 2 rows stockinet – Sable
Knit 3 rows stockinet - Fuschia
Knit 2 rows stockinet – Sable
Knit 12 rows stockinet – Fuschia
Knit 2 rows stockinet - Sable
Knit 3 rows stockinet - Fuschia
Knit 2 rows stockinet – Sable
Knit 3 rows stockinet - Fuschia
Knit 2 rows stockinet – Sable
Knit 6 rows stockinet – Fuschia
Top flap:
Continue for remaining rows in decrease pattern:
Row 1 – Knit 2, SSK, K across to last 4 sts, K2tog, K2
Row 2 – Purl
Stripe pattern for decreases:
8 rows Fuschia & Flora
2 rows Sable & Flora
3 rows Fuschia & Flora
2 rows Sable & Flora
3 rows Fuschia & Flora
2 rows Sable & Flora
2 rows Fuschia & Flora
Bind off remaining stitches.


 I decided to check out Monterey Yarn on Bellevue Street in Green Bay because it was the closest yarn shop to our hotel and I only had a short time for a visit. Boy, was I pleasantly surprised! It's a wonderful shop with tons of beautiful yarns, lots of samples made up (I love to see stuff all knitted up!) and was staffed with two very friendly and knowlegable women. I browsed around and picked up some nice natural cotton yarn, a pattern for some adorable felted baby slippers, and some cute knitting themed cards designed by Kim Cheeley. I could have spent a lot more time there and will definitely put this shop on my "must see" list if I'm passing through Green Bay again.


 A highway patrolman pulled alongside a speeding car on the
Many years ago my wife was to knitting what Tiger Woods is to golf. She designed exotic patterns with ease.
There was an occasion when we had lunch in a real Chinese restaurant (only one person spoke partial English, all menus were in Chinese). When she saw the hand-written menu she was so impressed with the calligraphy she tucked the menu in her purse. Some months later I saw the result, a stunning white sweater with the Chinese symbols hand-stitched down the front.
She received compliments galore until one cocktail party when we met a distinguished Chinese physician who asked my wife where she got the symbols. He then wanted to know if she knew what they meant.
"I'm afraid to ask," she said, "but tell me anyway."
Even she had to laugh when he told her they read, "This is a cheap dish--but good." This one definitely has special meaning to me, as Pink Floyd is my all-time favorite musical group. In fact, my Ravelry name comes from a line in their song The Wall “All in all, we’re just another brick in the wall.” How clever to make a bag for all my yarn and projects from a t-shirt!
 The next thing I opened up was an original creation that really makes me smile. Laura made a felted replica of the Stone Head that is on the Pink Floyd Division Bell album cover. She designed it over a pez dispenser (I also collect pez dispensers) and it is one of the coolest things I’ve ever received! Here’s a pic, along with another shot of that cute t-shirt bag:
 Wowsers, even more to come! Next I opened up a series of oh-so-fun presents. From the Moon Lantern company, a beautiful silk knitting needle holder and a little notepad holder - the cover was adorned with a yarn and knitting needle design. And to pamper myself, a mini spa set, complete with Sandlewood candle, bath fizz, a crystal, and a clay mask. Laura also made me two relaxing sound of nature cd’s…..ah, I can picture the waves rolling in on a warm night! Here’s a picture of these presents:
 Am I spoiled, or what? Thanks to the best swap partner ever!! Here’s a final picture of all of my gifts:
 This was so much fun I've signed up for two more knitting related swaps. I think this could become addicting........


 My Kindle 2 arrived this week! So far, I'm impressed with all the fun features this electronic reader has to offer. But how can this cool reader enhance my knitting? I set out today to find out.